Well, I figured that as Day 3 had arrived, I might as well do something about the hundred quid thing, and so I tackled the bit I always dread the mostest - the woodwork.
Not that I'm doing anything flash or clever - though I expect some of the other 'participants' will be dusting off timber they laid down in the seventies for such an eventuality as this. Nope, my woodwork requirements are limited to a few minor tweaks to accommodate the gubbins that I'm using that isn't particularly Tele designed.
First of these was the holes for the tuners. I've got some nice Wilkinson ones I got for a fiver off eBay, but they are too big for the existing holes.
I read around and apparently I should:
'Carefully ream the holes out, taking care to rotate the hand reamer in the direction of the grain'.
That sounded simple enough, so I got an Electric Drill - these still scare me and I wish I had a handraulic one, but I haven't, so there we go. Anyway, I got the drill and tried a few different drilly bit things until one of them made a hole that would let the tuner peg go through, and then repeated another five times. Lovely.
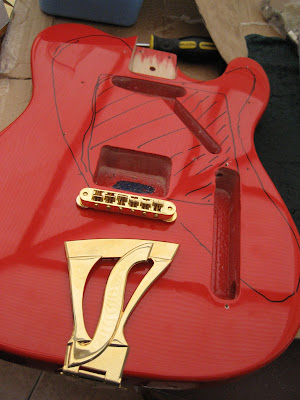
Next, was the bridge and tailpiece. As both of these are more archtop suited, I wasn't surprised to have to make a couple of adjustments. Again I expect I should have used something full of voodoo to do the actual hole making, but once more an electric drill did the trick, and as you can see on the foto, the ABR bridge thing snugly dropped it lovely like.
On a bit of a run here, I thought, and so I pushed on.
The next thing I wanted to do was reshape the headstock a wee bit. The original was slightly odd looking to me, and I wanted to soften the edges a touch. To do this I got a steak knife and did the first bit of whittling I've attempted since I sliced my knee open trying to carve a tent peg, around about the time of the Silver Jubilee.
Actually, the headstock now looks a lot like that tent peg, thinking about it.
Once that was a nicer shape and smoothed with some sandpaper, I gave the rest of the neck a wee sand too, to try and remove the light varnish that was on there. I'm not sure if I said before, but the neck is a light, and insipid colour, so I had decided to Danish Oil it. To give it a nicer hue and bring the grain out a bit.
As it turned out, the varnish was about a micron thin, so no problems removing it. The foto shows the headstock and neck with a first coat of Danish. I'll do a few more over the next day or two. I have also got some quite treacly varnish, but I think I'll stick with the oil to be honest.
One final job, is to route out the body so that I can fit the P100s or Sustainer electronic gubbins in. Again, on the foto I've marked out the wood I'll be removing, as well as the scratchplate outline - well, roughly anyway.
I've had a quick look at doing this, and my trusty chisels seem up to the job, but I tell you what, I don't know what wood this is made from, but it is rock solid. Nothing like the lightweight stuff the Paisley One is made of, that took a few minutes to route out, this might entail hard work.
Bearing the work angle in mind, I'll maybe do it tomorrow, depending on time and all that. You can't push yourself too hard, after all.
So there we are, Day 3 and we're in the biz. Lovely.


No comments:
Post a Comment