Thursday, 12 January 2012

The Rust and the Rose

Well, today has started well thanks to a late night and a rather early start by my sloth-esque standards.

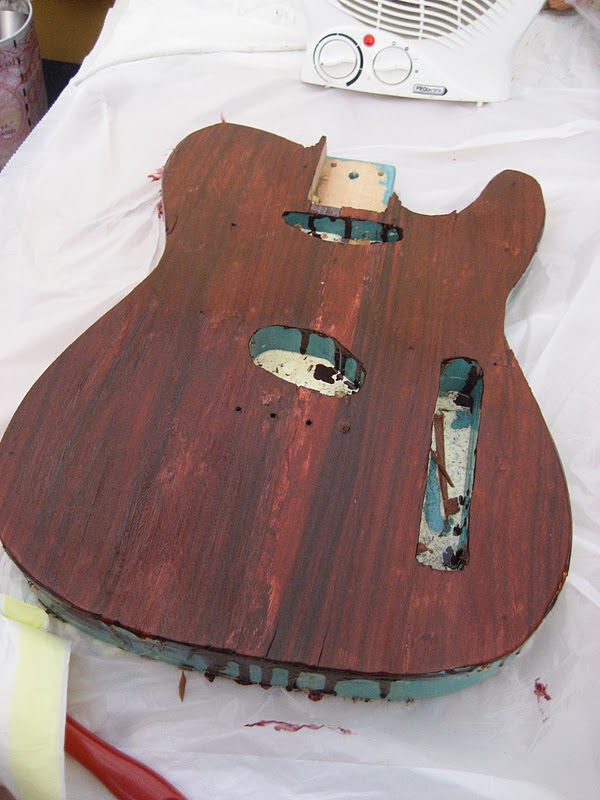
Yesterday, I got going on the 'Rusty Binding' of the roseywooded The Gypsy One, and it has gone better than I hoped.

When I started on this, I mentioned that I have always wanted a George Harrison inspired Rosewood Tele, but The Gypsy One was never meant to be a simple clone, as well, where is the fun in that? Duhh.

The idea of the rust is to make it look even older than the rough rosewood already does, and is a tad pragmatic too, as it means I can sand in the edges of the veneer without worrying about binding or laminating the edges. Cop out perhaps, but that is more of a bonus.

Anywaysup, as you can see I gave the edge of the guitar an iron paint, bringing this over the front so hopefully we will end up with a rustific seventies burst type of thing.

The iron was then corroded a couple of times and then fixed and lacquered. It is has pretty much dried now and just needs a few more coats, to look deevine.

I also did the pickguard and headstock, which have turned out well too.

My only concern is whether I will have left enough rosewood visible once the bridge, control plate and pickguard are on, but I think we'll be OK.

So today, more lacquering and drying and then there is the small matter of the back to rustificate...

All good stuff.

Iron painting the edges

Then they go rusty like a fox

A bit of funky lacquering


Add pickguard to flavour

Wednesday, 11 January 2012

WIP: The Gypsy One - Round 2

Now, that's better than the Jelly look...
Well, I have to say that the veneer is rather nice. I wanted it to be slightly cracked, raised and rustic-looking here and there and generally osteo-decrepit and old, and it seems that way...

Anyway, I've cut out the pickup and control cavities and if this courier ever shows, will sand in the edges.

As for the lacquer, well I'm going to give the veneer a couple of coats to seal it, and then once that is dry move on to the rusty edging, and back. Doing it this way hopefully means that the iron paint won't bleed into the veneer (it did on my little tester) and that I can build up a few layers. I want the rosewood to look battered and unstable, but be quite the opposite in reality, so that it might actually last a good few years.   

It's all quite clear in my head now and as long as I avoid using the raspberry jelly/rosewood varnish, it should be close to the initial aim.

Hopefully.

Well, we'll see.

~~~~~~~~~~~ Musically challenged interlude ~~~~~~~~~~~

And as time has moved on, the courier has come and gone with barely a word (typical man) and I have indeedy sanded the edges and generally spruced it a wee bit here and there. I widened a fortuitous split in the veneer in a couple of places and am planning to fill them with some rusty stuff, if that makes sense.

The top is now on it's second coat of lacquer and once that is dry I'll move onto the rusty ironing around the edges.

Speaking of which, I'd decided to have a rusted pickguard while I am at it, so I have started that too. And then when I remembered, I went for a rusted headstock face thing as well.

Some days there is just no stopping me, like a rattle up a hosepipe, or something, so I is.

~~~~~~~~~~~ Even Later-ish ~~~~~~~~~~~

Well, the lacquering of the veneer is done and I am going to leave it overnight. I went for quite a few coats in the end as I want to find a balance between it looking like it is decrepit and likely to fall off, without that really being the case. It should be pretty solid now anyway and I can get going on the iron edging tomorrow with a bit of luck. Along with the rustification of the pickguard and headstock.

All the remaining parts should hopefully arrive tomorrow or Friday too, so with a bit of luck we might be putting the first of the 2012 Jookies together next week

So there we are. Everything done that can be done. The Sick One off to pastures new, I spent an hour or two gurning with The Old Burny One. Today was a day, and the day was good, methinks.


A Flattened Veneer - Blimey

Ironification for the Nation


A Sick Exit - Stage Not Quite Left

Well, it's always a sad day when one of the Jooky brood scrambles from my clutching hand and blinks in the daylight as it escapes the coop, but here I am waiting for a courier to collect The Sick One and take it to it's new home with Matt.

And even more than most I'll be really sad to see it go, not least because it looks cool and I haven't been able to walk past it without losing half an hour to it's nefarious charms, or because the Catswhisker P90 sounds so good. Credit where it is due, but Allan knows how to wind a special pickup and I can see me getting another of these for a future Tele. It is simply put, gorgeous.

While I'm waiting of course, I will be having a look under the sand and seeing what sort of mess I've made of the veneer on The Gypsy One. I had a sneaky peek last night and it seemed very flat and bubble free. Then I left it in the freezing cold, so god knows what it will be like.

While I'm thinking Teles, I also snapped up another of the beasts, which should arrive next week sometime. I seem to be on a mission at the moment, but it is just how the sticks drop really, no great masterfilled plan.

Courier, courier, where are youuu...?


Tuesday, 10 January 2012

Starting again - The Gypsy One

Step 1: Remove Gloopy Veneer - Check
Well, after the joy of my Gordo excitement (and man it plays like a d-r-e-a-m), and the excessive raunchiness of The Sick One, it is back to Jookyland's version of reality with an ample-stomach-gurning jolt and the crushing defeat that is The Gypsy One.

(And, yes, I noticed the nefarious glee at it's demise from Mr Gorman 'imself.)

And basically, I'm sitting here wondering what the hell to do with it.

I've realised that the veneer as it stands isn't really salvageable, so I figure a good start would be to strip it all off. and have another go, though how easy that will be I really don't know.

I'm probably being hopefilled, but I'm going to start by reaching for the iron again and trying to soften the glue. With a bit of luck the gloopyness of the varnish won't be so strong that I can't get it all off in one go.

If that doesn't work, and I can't say I'm uber sold-on-it, well I guess it is a sanding block and a lot of tennis elbow.

After that is started I'm pondering what comes next.

Not starting you'll notice given my new year's resolution to do one-at-a-time, just thinking for now, and the think I've been thinking is that I should really resurrect the idea of The Jo La Taxi One and do myself a La Cabronita, even if it is just to get it out of my system.

When I do though, I think I'm going to vary from the blueprint and not have a TV Jones in it as I originally planned, but instead go for something different. Not that I've quite worked out what shape this something-different will take, at the moment it is more of a faint blur just outside the corner of my eye, but different it most definitely will be.

Though I'm tempted by one of the Creamery's Wide Range 'buckers, it should be mentioned, like.

~~~~~~~~~~~~~~ Interlude In Activity Major ~~~~~~~~~~~~~~

Since I started writing this, I obviously got distracted and have managed to remove the gloopified veneer from The Gypsy One. Amazing what you can do with an iron and a Stanley.

Back to square one then, I figured I should get back on the horse-that-I-threw-meself-from, and have cut out my last piece of veneer into something vaguely Tele-shaped. I've also nipped out and bought a couple of small yet heavy bags of sand from Homebase which will hopefully clamp the veneer down better than the rock salt did, and save me more iron-time.

Assuming I get as far as the varnish this time around, I think I may well not use the rosewood coloured one and go au natrel and simply clearcoat it. Looking at the fotos from last time, it looked plenty good enough, I think, especially with a band of rust around the edges.

Who say I can't learn my lessons.


Step 2: Draw around body on new veneer - Check

Step 3: Cut new Veneer out - Check

Step 4: Gloss over the fact that you cut it out back to front - Check

Step 5: Glue it on and whack a couple of bags of sand on top -
What Could Possibly Go Wrong?

Friday, 6 January 2012

Everything is Lovely

Well, after yesterday's disaster with my slum-mud covered veneer, I've decided that I need to end the week on a high to avoid all manner of mental bobulisms, and so today, with parts in hand I'm going to finish off the resurrection of The Gordo.

Where we left it was beautifully battered with a gunstock treated oil, wax and walnut stained look that looks rather lovely, if you like a well battered gunstock, I err, guess.

Anyway, I've got some new Gotoh tuners with tulip ends (so they aren't too heavy), and have put some new posts at the bridge. I did get a Wilkinson tailpiece for sooper yet dooperish intonational joy, but to be honest I liked the battered original better so have stuck with it.

It is however, a complete change on the pickup front. At the neck I've gone for a Seymour Duncan Phat Cat P90, and at the bridge a Gibson '57 Classic, so basically it will have PAF and P90 tones, which are pretty groovy in my hoos. Other than that it is all new CTS pots, Switchcraft Jack and switch, a ridiculously enormous Mojotone capacitor, cloth covered wire and the rest. I've not gone for coil taps as was originally in the Gordo as basically the pickups aren't four-wired. Other than that I'll replace the strap pins with some jumbo ones when they arrive, and there we are.

And, after a bit of screwing and soldering, here it be....

I have to say I'm really rather pleased with it. The headstock is solid after I glued the cracks, and stained them obvious for goodly measurement, and the Phat Cat is divine. I'll have to admit not as biting as the Catswhisker P90 I've put in the Sick One (which I've also been preparing for it's new owner today - Matt it sounds cool), but pretty good. I think the Catswhisker one just feels bigger, but there we are. I'm not disappointed by it. As for the Gibson '57, that is sweet. Proper PAF sounds, just like everybody says. Even in this thinnest-of-mahogany bodied wonder it proper sounds, well, lovely.

So there we are, two lovely, lovely guitars I got to play today.

The week wasn't sooo very bad, now, was it?

Now that feels better.

Bloody veneers.


Thursday, 5 January 2012

Sometimes...I should stop digging

When the first coat is this bad...
Well, OK, so I've had a couple of OMFGWHYFM? moments since the last missive.

First of all, I sanded around the edges so that the veneer merges with the body of the guitar. That worked nicely. I was pleased.

After that I dug out my can of shiny-wood-varnish with in-built rosewood coloured stain. Gave it a good shake, and then a lengthy stir, dug out a shiny new varnish brush with sooper soft bristles the vegetarian in my doesn't want to contemplate. (They just shave pigs to get them, don't they?)

And then I gave it a first coat.

Now I think I said I'd gone for the coloured varnish as water based stains can cause all manner of fun with veneers - mainly bubbling, and as you've seen I can do that sort of thing unaided. So this seemed a good idea. Varnish with a hint of roseywood colour for a deeper, lasting shininess.

So I put on the first coat of the gloopy browny-red gunk in the tin, and it covered beautifully. Too beautifully in fact as it is so thick I can no longer see any of the beautiful grain I was in love with just a hand filled with beautiful moments earlier.

So, I ask myself, why didn't I just clearcoat it?

And the answer is...I DON'T KNOW.

Sheesh.

Anyway, three hours later and it is dry and ready for another coat, so what do I do?

...the Third isn't going to be any better.
Yep, I keep chasing and put on another, and then another layer of silt still. Hoping, rather sadly, that by some miracle this reddish mud I've plastered across the guitar will somehow become translucent.

But it didn't, and I have to say it looks shite.

I hate it.

I could hit something, or somebody if they were really small, feeble and truth be told, restrained too.

I'm not much of a fighter, has to be said.

So there we are.

Failure, nipped from tween the broken teeth of possible just-about-good-enough, err, jaws.

Back to that there drawing board, methinks.

WIP: The Gypsy One - Veneer Disease

Artistic impression that is
nowt like it will really
look once it is dustless
and finished.
And so it is Day Two of The Gypsy One's morphingisation, and it is proving to be a rocky road.

The story so far was that I'd glued the veneer onto the front of the guitar and left it to dry overnight (forgetting that sub-zero temperatures, probably won't help.)

Anyway, this morning it is dry somehow, and feels nice and solid. The only slight ant-in-the-currant-bun is that it has raised and bubbled.

Hmmm... Not quite all that good.

Amazingly, I had foreseen such a scenario and knew what to do (hence skipping the woah-is-me/throw the guitar into the garden approach I may have taken.)

To fix the bubbles, I then reached for an iron (for the first time in, well, not sure how long - it may be ever) and some Bacofoil, and ironed the veneer.

Now, this probably sounds dizzy, but the heat from the iron melts the glue and the weight of it flattens the bubble, where it can re-stick all flat like. This took a fair while, but worked, and three more hours drying under a hundred-weight of salt, seems to have done the trick.

Once that was done, I've roughly trimmed the edges and chopped out the holes for the pickups and control plate.

I bolted on the bridge and pickguard so you can see how it looks, though the pickguard is going to be rusty.

So there we are.

Next I'm going to be sanding the edges so that the veneer and body are un-jutty-outy, when I put the iron paint around the edges. Between those two jobettas though, I'm going to give the rosewood a few coats of shiny varnish to see how it looks/protect it a wee bit.

As for the back of the guitar, I think I may have enough veneer left to do it, although I am tempted to go for an iron paint. I'll leave that decision until the top is done, methinks, just in case it all goes belly up.

On the pickup front, I've gone for a set of Jess Loureiro's handwound Broadcaster/Nocaster pickups. I had a P90 off the chap a while back and have been tempted to try these for a while, and there we are. I like the idea that they are period-correct and well, basically that is good enough for me.

So, all good stuff indeedy.

Crinkly Cut - Not a good look

I always tin foil my ironing

Flat and starting to be chopped

Wednesday, 4 January 2012

Getting Started: The Gypsy One

Should look good
If it ever works...
Well, Day One of a new year in Jookyland (now that the bratskis are back at the coalface or up chimneys or something), and straight away I thought I'd go for the jugular and try putting a veneer onto The Gypsy One.

I know, I'm outrageous.

In fact, I have to say that I may have been getting carried away, thinking about pickups and stuff as my little trial with a bit of veneer and a block of wood didn't exactly go totally to plan.

Oh, don't get me wrong, it stuck like a barnacle, but it is the cutting of it that was a wee bit more problematic-esque as the veneer splintered whenever I got within 100 yards of it..

Now, I'm hoping it was that I need a sharper or stronger knife rather than that I've lumbered myself with some inappropriate, err, lumber, but I can't honestly say I know for sure.

My little plan to use a Gibson '57 at the neck of the Gypsy One has also gone out of the window as the body isn't routed for a 'bucker' and I'm a bit reluctant to get the chisel out and widen the gap, though I'm not really sure why. Instead I think I may put it with the Phat Cat in my Gordo. But I digress.

Sooo...need to think about pickups a wee bit, I guess.

But back to the progress:

1. I gave the body a good going over with some sandpaper, to toughen it up a bit.
Oddly my Dad did the same to me when I was a kid.

2. I got a couple of chunklets of veneer, slapped a bit of masking tape between the two and then chopped it to something approaching the size of the guitar body. I nipped out and bought a decently sharp and dangerous looking knife after a few dismally failed efforts and this proved a good move.

Anyway, this will be glued onto the front of the body. I did try cutting a piece for the back and totally screwed it up, so I'm now a tad worried that I won't have enough veneer to do both front and rear, so I'm doing the front as it will be OK with just the front done, but not so OK if just the back is veneered. I could buy more veneer, but I'd rather not.

Did that make any sense at all?

It's not just chucked together this, you know?

3. Getting a bit serious now, I splattered glue all over the veneer and over the body. Lining everything up very carefilled-like, I dropped the veneer onto the body, then slid it around a bit until it looked vaguely straight. 'There we are', I thought, and I was right. We were.

4. Obviously, the really hard bit with putting a veneer on is to apply pressure across the whole of it at the same time so that it sticks properly. The proper way is to either use a vacuum bag contraption or loads of clamps and cawls (cauls?). Obviously, I haven't got all that so I am going to use a couple of bags of rock salt that we got in case the pavement gets icy. I don't really know if this is heavy enough, but what can you do? I'll whack them on top of another Tele body which will maybe possibly just help enough to be useful.

So to summarise - we have a piece of veneer roughly the correct size.
I've smothered the back of the veneer and the front of the body with Titebond glue, then slid the veneer so that it is in place.
I've now lumped some bags of salt on top to hold it in place while it dries.

Sorted.

Tomorrow will either be a case of trimming and tidying, or trying to remove the veneer and starting again.

La la laaaaa

This is gonna be sooo purrttyy

Nothing works first time, right?


Loins-all-a-gird
Getting Gluey


Using another body to hold it in place

Tuesday, 3 January 2012

Scraping Sleepy Dust Out Me Eyes...

A Rosewood Tele
Seen Earlier Today
Well, all of that being nice to each other bobbins is good and over for another year, the kids are back at school again tomorrow, so I can get up and get back to the important job in hand and start to actually do something Jookyish at last.

Not that I'm selfish.

So where were we?

Well, I'm still waiting for the tuners and pins for the Gordo, but have given it a few more polishes with some gun stock polish gubbins, and I have to admit it is probably as good as it is ever likely to get. I'll show you it again once it is all done, no doubt. But it still looks like it has been in a minor war, which is nice, but at least it looks like it was patched-up in a field hospital before returning to the fray.

As for Jooky-stuff-proper, well top of the shop is to have a go at the veneering of The Gypsy One.

*gulp*

This could of course be doomed to failure, but I'll never know unless I try and despite not having the right equipment, I'm taking my usual low-tech approach and crissing my fongers.

I was thinking of developing a Plan B for when/if the veneering proves to be beyond me, but remembered being told once that if you fail to plan you are planning to fail.

Which was quite 'Tony Pullis', it has to be said. Or maybe Dell Boy Trotter, though much the same thing, really.

Then I thought that actually having a Plan B meant I was planning to fail (even if it was just in case I fail) so then I thought that maybe not planning to fail would be better as that would mean that failing to plan was a positive after all, and I should go with the status quo.

So not having a Plan B was a positive thing to do and not just me being slack.

So whatever you want really.

I'll just see what happens and make it up as I go along, as per..

Which is bound to work first time, innit?

Normally at this point I'd list all the other projects I won't actually be doing anything about before Easter, but in my new one-at-a-time-and-focus-damn-you approach to all things Jooky, I'm not going to. Hopefully I'll confuse myself less that way.

But the Gypsy One, well I've gone for some lovely Gotoh tuners, a Lollar bridge pickup and a rather splendid Gibson '57 humbucker at the neck, which I think fit my roseywood dream Tele more. All a bit Graham Coxon really, but there we are.

Oh, and the bridge will be standard brass saddled as you'd expect.

I'm still in two minds about the neck - I have a maple 'boarded one, but wonder whether a rosewood one would be a better bet. We'll see when I finally attach it, I guess.

Assuming I ever get that far.

Being a New Year, I was thinking that this is a good time to unveil all manner of clever changes to the guitars, the way they are made, how I source things and to introduce my new team to take Jooky forward, but as none of those things have happened or are likely too, well, maybe another time, eh?

Things will go on in the same old familiar hap-hazard-ness, and it is still just li'l ol' me..

So there we are, clarity thy name is Jooky.
Here we go again

Sunday, 1 January 2012

So, 2012 then, is it?

One Sick Guitar - Made In 2011 Shocker
Well, I've kinda gotten to the end of the year and have been thinking about what comes next, and then whined about it until I basically bored myself silly. I'm guessing you too...

Instead of doing that again, I thought I'd skip the recap of 2011 and then maybe do a bit of a wish list for 2012 (leaving out the Miss World hopes for global peace and free cookie dough ice-cream for all.)

So after the vacillation of 2011, my firmish plans for 2012 are:

1. The Gypsy One: I want this to be an old school Tele. It will hopefully have a rosewood veneer over it's alder body, with rusted iron accoutrement's. Pickups I'm thinking will be traditional Tele - maybe Bare Knuckle Blackguards or something similar.

2. The Explorer-with-no-name: This is one I'm making with someone in mind. It will be solid mahogany, P90 at the neck and something PAF-like at the bridge. A combined Copper and bronze finish, corroded to be colour-filled.

3. I haven't done a single pickup Strat for a while and fancy trying something different pickup-wise, maybe one of The Creamery's Wide-Range 'buckers or a P90 soapbar.

4. A La Cabronita Tele - I planned the Joe Le Taxi One and then changed my mind, but I still want to do one. Might use something different to the normal TV Jones though, we'll have to see.

5. A Les Paul Junior. Nuff said.

6. Another Telemaster - I loved The Porn Shop One, so I might see what else I can come up with in that direction.

7. Something offset that isn't a Telemaster - I've lined up a body which I think will be interesting. More of a long term project that though, I fear. I have to have one that drags, after all.

8. A bass - not sure what this will be, but it is about time.

9. A Vox Teardrop shaped guitar

10. A Rickie shaped guitar

And that is it for now really, though I'm sure it will change before the end of the week...

Anyway, thanks for reading along and I hope I'll do something worthy of any vague interest you may have left, in 2012.

Happy New Year peeps. As gypsy-ness is top of the list, I thought of this...

La la laaaaaaa

Wednesday, 28 December 2011

All is Art - La la and a Laaa

Well, still no sign of the bits 'n' bobs for The Gordo, and no chance of getting to do any veneering this week, so The Gypsy One is still a box of parts. Instead, I've been consoling myself by playing some groovy bobbins on The Old Burny One, which is all verily satisfying after taking quite so long to get it together.

I have to say I am really in at least three minds about whether I should keep this one or not. I've lusted after a Les Paul for quite the longest time, and (with the pleasant surprise of the pickups suiting me perfectly) I'm kinda wondering what I'm thinking of.

The loose plan was that this year (next year - 2012 I mean) I would finally get a proper Les Paul to have done it, if that makes sense. Not that I'm impressed by manufacturer's labels - I normally find myself sanding them off, of course -  and in truth it was likely to be a Studio if I saved my pennies wisely a nice second hand one might be achievable over the next 12 months, but then I play The Old Burny One and really it is just the thing I've wanted.

Decent weight, lovely properly bound neck and I love the gold finish, so...I have to wonder what am I thinking of?

I mean, I spent a couple of afternoons recently playing new Gibsons, and a few second-hand ones too, and if I'm honest none of them quite caught me, though I'd have been happy to own any of them. So nice, but no banana; nothing that grabbed me and said this is really special keep-me-keep-me-oh-keep-me-why-don't-you?

And when I got back and played my golden Burny, it just did.

So I could sell it and spend forever trying to find a guitar that is just like it and failing dismally, certainly at the price I can afford to pay.

So I don't know. I mean, I know the answer is obvious - keep the guitar and enjoy it, but the downside if I keep it is of course that the next couple of Jookies are tied up in it, if that makes sense. One sold pays for the next to be made and all that. And if I keep this one, I'm kinda stuck going forward.

*sigh*

So it has to go really, as that was the point of the golden rules after all. Or I could flog my Jazzmaster, but that isn't going to happen.

La la laa. Stress.

In truth, I'm still all of a ponder about next year and what I'll be doing, but one thing I know is that I should be receiving an offset body in the near future, which could be fun. This is a bit of an oddity and the chap I'm having it from knows little more about it than it is sycamore and rather down at heel. It looks as though it is routed for a couple of single coils and a hardtail bridge (as far as I can tell), so it should be fun, methinks. I'm hoping a couple of Jaguar single coils will fit in nicely, though I might have to get the chisel out, not sure yet.

The neck coming with it is in need of frets, which I might have a go at doing, but as long as it is standardish I'll probably be putting a nice big headed Strat neck on it anyway.

Otherwise, I have the Explorer-with-no-name to sort out. I've had to degrease it before it can even be prepped for whatever happens to be the finish and it is truly minging. In fact it is in a black bag at the moment smothered in some special de-gunker for the third time. I think it may have been Damien Hirst's at one point and was previously suspended in aspic or cod liver oil.

I may have that wrong though. (Excuse the disclaimer, but while I know Damien doesn't pop in too often, I do know that Tracey Emin is a persistent reader of this blog and will no doubt tell him I said that, and then shit on my bed or something.)

Where was I?

Oh yes, 2012, of course - in summary, I'm still pretty clueless.
Much like 2009, 10 and 11, then.

A tootle and a pit.

Tuesday, 27 December 2011

Well Oiled

Well, we're beyond Boxing Day and I've snuck in a couple of Jooky bits between the Quorn fillets and chocolate and liquorice allsort excess.

Not a lot to see, in truth, but I finished oiling up The Old Gordo and let it dry so that it is nice and nourished and shiny, and since have started to polish using the 'Stock Sheen and Conditioner', which goes on wet and needs a fair bit of buffing. 

I'm aiming for more of a softish sheen than a full on gloss, but we'll see how it turns out over the next few days. As I said, if I can get it playable by the end of the year I'll be well pleased with meself.

Once the buffing is done I have actually bought a second type of wax finish for the final coat, but it might be gilding the tulip and I may recognise it as 'finished' before I get that far anyway.

After that it is a put together job and a bit of soldering (and I got a shiny new soldering iron for Christmas) so hopefully not too much grief to come from that direction. Though I've just remembered the tuners never arrived before Xmas, so I'll probably be waiting for a couple of days for those.

Anyway, all the polishing is done so I'm off to linseed oil my rosewood...which is also now done, and looks lovely and dark and woody.

I've also just put the pickups on it, as it happens, the Seymour Duncan Phat Cat at the neck - bit of P90 joy - and I've stuck with the Gordo pickup at the bridge as I rather liked it and can't think of 'owt better at the moment. For the pots I've gone CTS, and the switch is bog standard Switchcraft

La la laaaa

*** Later ****

As it happens, I've since managed to wire this baby up and finish the polishing. It looks rather cool and sheeny, it has to be said.

All I'm waiting for now are the tuners and some bigger strap pin things as the others were a bit ropey.

Teerr-daaahhh


Saturday, 24 December 2011

Flaunting The Imperfection

Staining the Back
Staining the Headstock and neck
Well, I managed to both charge the camera and put the walnut stain onto the back of The Old Gordo *, so here are a couple of fotos.

It will need a while to dry so it probably won't be until after Xmas that I get to do the front, but it looks pretty cool to me so far, so I'm reasonably chuffed. It nicely displays where I glued the cracks, which is always a bonus (ahem).

Flaunt the imperfection - the story of my life.

I can't quite decide whether to stain it all and then do the oil, or finish the back before I start the front. It's a toughy, I have to admit.

To do this all, I bought a 'Gun Stock Tarting-up' set with the stain, oil and polish in it, along with sand paper/wire wool etc.

All very nice, but it was the free target that most impressed me. Glow in the dark and self-adhesive - great for putting on some body's back as they leave a New Year party this year. All those drunken Young Farmers living around here will have a ball.


****** Musical Interlude **********

Well, as it happens the stain had dried before I had gotten around to posting this missive, and so I went ahead and gave the back of the body, neck and headstock an initial coat of Tru-Oil, which looks rather nifty. The stain has gone into the scratches and scrapes beautifully and the oil has brought them and the grain out super-smartly. I'm really pleased.

Oiling the Back
No doubt, I'll have wire-wooled and re-coated it before I get around to putting this up too, so you'll probably be able to see what I mean.

******* Another Gap of Hours ******
Well, I smoothed it down with the wire wool and gave it another coat of Tru-oil. Left it a couple more hours yet, and did it again.

It really does look cool and a fair few shades darker than the Danish Oil had left it, so I'm pretty pleased with that. I'll finish the back before I start on the front, I think as it seems the right thing to do.
Hopefully the oil will be finished by tomorrow and I can have a play with the 'Conditioner' or polish as I would innocently call it.
.
This is all so exciting that I've even dug out the new wire, pots and switch, so I might put them together. just for the hell of it, like.

There's always something productive about holibobs I've noticed. I guess it is a good way to escape the bratskis...

*** The Next Day ****
Well, Crissie Eve and the oil on the back is done, is verily sheeny and looks rather good, I have to say. As the next step is to wax it, I've decided to start on the front, and that has now been stained too. Once that is dry I'll do the Tru-oil thing and hopefully wax the whole guitar as one next week. It would be nice to be putting it together before the year is out, just depends on the way Xmas pans out, I guess.

Anyway, once again, have a fine Crimbulmus.

* Note to self:
Wear gloves next time you use stain stuff, the eighty-a-day-habit look is sooo outdated.


A Well Oiled Headstock - with stain enhance cracks

Staining the Front -
Loving the grain and the scrapiness

Friday, 23 December 2011

Happy Holibobs

No, I can't see it turning out that shiny either
Well, not a lot doing at the moment that doesn't involve tinsel and queues, but I have started on my little re-vamp of my old and generally battered Gordon Smith. Just to keep my hand in, like.

I know I've mentioned it before, but the bottom line is that it had a few wee cracks at the headstock around the tuners, and I figured that while I was gluing and clamping those I may as well give it a right royal seeing to, as it were.

So first things first, I stripped it down, and have used some Titebond  and a couple of clamps. This stuff did the business when I fixed the neck on the Busted Dot and these are less critical, so I'm sure it will be fine.

Once that had dried, I ordered some new tuners that will fit the original holes, which will hopefully stop any reoccurence...

The next job will be to refinish the body.

Now when I got it, one of the attractions for me was that it was 'naturally aged' in fact battered and scribbled over in parts being closer to the truth. At the time I de-gunked then Danish Oiled it and it improved no end. However, this time I'm going to go a step further and stain it a darker shade of walnut and properly finish it with Tru-Oil, conditioner and wax. This is basically the approach people take to protecting their Gun Stocks and should look the business without losing the original charm.

At least that is the plan, guess time will tell.

After that it is hardware. The tuners of course are new, and then I am replacing the wraparound bridge and posts with a Wilkinson one which will help on the intonation front. Must admit it isn't something that over worries me and I'm in two minds, so that is a maybe at the moment as I like the original tailpiece and the Wilko one looks a tad shiny and bulky by comparison. So I might just change the posts which are the bit that are broken after all, we'll see.

Pickup-wise, I've got a P90 - a SD Phat Cat - for the neck and will probably stick with the Gordon Smith pickup at the bridge. Though I have a SD '59 which might be sweeter. Apart from I am swapping that for a guitar body. Hmmm...maybe keep the Gordo then, or look for a nice PAF. Not sure.

What I do know for sure is that I'm going to take the chance to replace the pots and wiring while I am at it, as it is daft not to, let's face it. I've got some Ye Olde Worlde wire and a MojoTone cap, so that should work out OK.

As for the rest, the frets are low but good apart from a couple which are a bit flat, so I'm going to break out my lovely crowning file thing to sort that out. I've been practising on old necks and am feeling pretty good about it all now. The proper tools definitely help, I've come to accept.

After that, I'm going to Linseed oil the fretboard which should give it a lovely dark hue - I used to use Lemon Oil but read somewhere that Raw Linseed is better if you don't leave it on too long and it seems to do the biz - and there we are.

Basically then, this is meant to be my Christmas holibobs project, so I'll wang some fotos up as I go...once I've charged the camera back up anyway.

And of course, if this proves to be 'it' - Happy Xmas and cheers for reading along with the vaguely psychotic chaos that this Jooky bobbins is...

La la laaa

Wednesday, 21 December 2011

At Home, With The Gormans

Well, a weekend away-from-it-all before the dash to Xmas proper, tis all good stuff.

Obviously there isn't much going on Jookywards, but my little practice sesh with the veneer went better than hoped so I'm going to make a start on The Gypsy One in oddly grabbed moments.

I've also made a beginning toward getting some parts for it and have gone for a set of Bare Knuckle Yardbirds and another set of Brown Sugars which should be nice and warm whichever way they fall, I would think.

I've gone trad on the bridge and tuners, have a maple/maple neck and there we are. I suppose a rosewood 'board would have made more sense, but what the hell, I'm not exactly interested in building a clone of Mr Harrisons or the like.

As for the New Year well I think I've said before that this year's planning is based on the third law of  the see-what-happens principle of Jookiness, but I don't doubt it will involve a few guitars here and over there-ish.

Totting up, there were 24 new Jookies in 2011, and I think that is probably too many for one so slack, so 2012 will be a lighter load. It's about art after-all, sugary one, not production stats.

One lovely thing, I just noticed I'd got an email, and the above foto is of the Gorman boys with The Lulu and Porn Shop Ones in the old school science block where they all live together - kinda like the Partridge family, but post-puberty. Obviously they re-decorated the place themselves.

Now, they are a couple of guitars I'm proud of, and nice to see that Chris (henceforth 'Chas') and Dave have taken the whole Movember thingie to extremes. Cool chaps both and I'm rather pleased that they got the guitars as they are top fellas indeedy.

Plus, of course, they can play them better than me, which isn't a great claim-to-infamy, but there we are.

If you haven't already, tis well worth checking out Gorman, btw. You can hear some cool tunes HERE.

Happy Crimbulmus to two and all over the place, like.

Thursday, 15 December 2011

Sold: The Old Burny One

About The Old Burny One

The Made In Japan ‘Lawsuit’ guitars of the 1970s and ‘80s were legendary for their quality and attention to detail. Many believe that they were better than the Gibsons they copied, and I’m not one to argue with the many.

The Old Burny One is one of these, an early 1980s Burny guitar, with a solid mahogany body and neck and more Mojo than a Mojo tree in Mojoland, MJ.

From a stripped down beginning, here in Jookyland we have painfully given it a golden top using 24 Karat Gold Leaf, and a variety of potions and unctions to both age it and protect what that leaves. It really is stunning too, none of this 9 Karat bobbins you get down Samuels.

In keeping with it’s vintage, we’ve gone for a set of Bill Lawrence designed Gibson ‘The Original’ pickups. These were fitted in Gibson guitars for only a short period of time before (allegedly) Gibson and Lawrence fell out and went in different directions. They are quite lovely pickups, giving all the old PAF tones, but with a bit of extra oomph when you need it.

To control these beasts well, we’ve gone for one of Shugz’ vintage wiring looms, complete with Russian Oil-in-Paper capacitors, CTS pots and all the good things. The difference between this and your standard Gibson wiring these days, is frightening. Other than that, tuners are Gibson (Klusons), and the ABR and ToM are Gotoh parts and work beautifully.

This really is a stunning guitar in every way, what else can I say?

*

To be clear, The Old Burny One is an utterly unique guitar, and there will never, ever, be another made. It is signed and numbered, entirely hand built and finished cooler than a British Dylan. There will genuinely never be another guitar like this and past experience suggests that it won’t be around for long.

*** SOLD ***

Type: Marilyn’s Gold Top Guitar

Pickups: Gibson/Bill Lawrence ‘The Original’

Guitar Type: 1980s MIJ Burny Les Paul Custom

Construction: 24 Karat gold leaf over mahogany.
Dean Markley Jimi Hendrix Pure Nickel Strings 10s

Output: ¼” Guitar Lead

Controls: 2 x Volume, 2 x Tone '50s Wiring

Special Stuff: Certificate of Authenticity, Builder Signed and Numbered, All Wrapped with our Trademark Jooky Wrapping.

Case: Hardcase

Serial Number: JGE#38

RSP: £799